
bonavita crib assembly instructions
The Bonavita crib assembly instructions provide clear guidance for a safe and efficient setup, ensuring your nursery is both secure and stylish for your baby.
1.1 Overview of Bonavita Cribs
Bonavita cribs are known for their durability, safety, and stylish designs, making them a popular choice for nurseries. These cribs are designed with practicality in mind, offering easy assembly and versatility. Models like the Cabana and Peyton cribs are favorites among parents, blending functionality with elegant aesthetics. While assembly is generally straightforward, some users have noted challenges in locating original manuals, especially for discontinued models; Customer service resources are available to assist with assembly queries and parts replacement.
1.2 Importance of Proper Assembly for Safety
Proper assembly of a Bonavita crib is critical to ensure the safety and well-being of your child. Incorrect assembly can lead to structural instability, creating potential hazards such as collapsing sides or sharp edges. Following the provided instructions carefully helps prevent these risks and ensures the crib meets established safety standards. Always double-check for missing parts or damaged hardware before use, as these can compromise the crib’s integrity and your child’s safety.

Preparing for Assembly
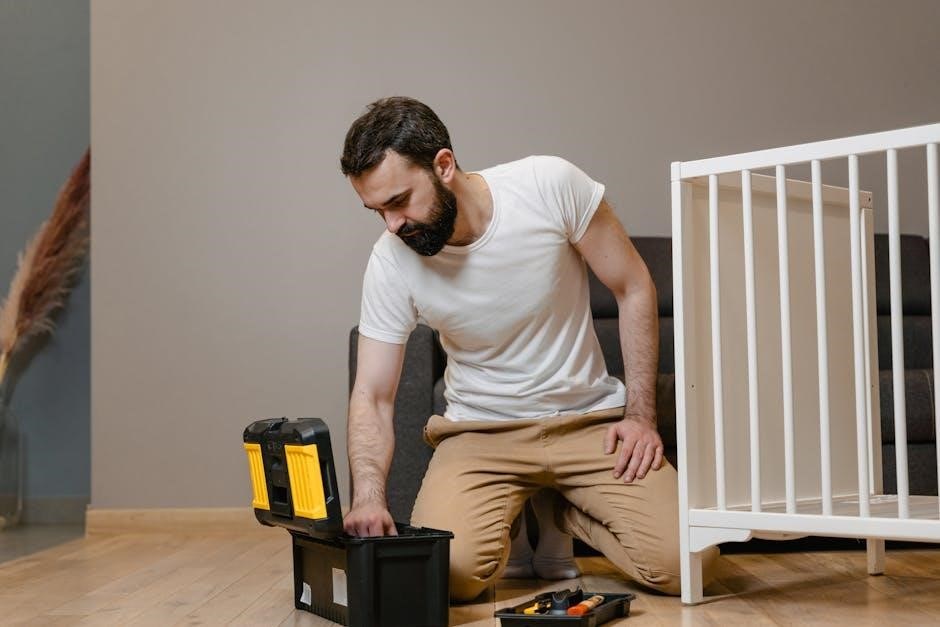
Gather all tools and materials, including Allen wrenches and screwdrivers. Unpack and organize components carefully. Read instructions thoroughly before starting to ensure a smooth process.
2.1 Gathering Tools and Materials
To start, collect all necessary tools like Allen wrenches, screwdrivers, and bolts. Ensure all components, hardware, and the instruction manual are included. Verify the packaging for completeness to avoid missing parts. Organize items by type to streamline assembly. Double-check for sharp edges or damaged pieces before proceeding. Proper preparation ensures a smooth and safe assembly process for your Bonavita crib.

2.2 Unpacking and Organizing Components
Begin by carefully unpacking the Bonavita crib components from the box. Lay out all parts on a flat surface to ensure nothing is missing or damaged. Organize pieces by type, such as frame sections, hardware, and mattress support. Check for sharp edges and verify all bolts and screws are included. Review the instruction manual to familiarize yourself with each component. Proper organization prevents confusion and ensures a smooth assembly process.

Step-by-Step Assembly Guide
Start by carefully unpacking all Bonavita crib parts from the box. Check for completeness and inspect for damage. Organize components by type, such as frame pieces, hardware, and mattress supports. Use the instruction manual to identify each part. Ensure all screws, bolts, and tools are included. Proper organization prevents delays and ensures a systematic assembly process; Lay out items neatly to maintain clarity and ease of access throughout the assembly.
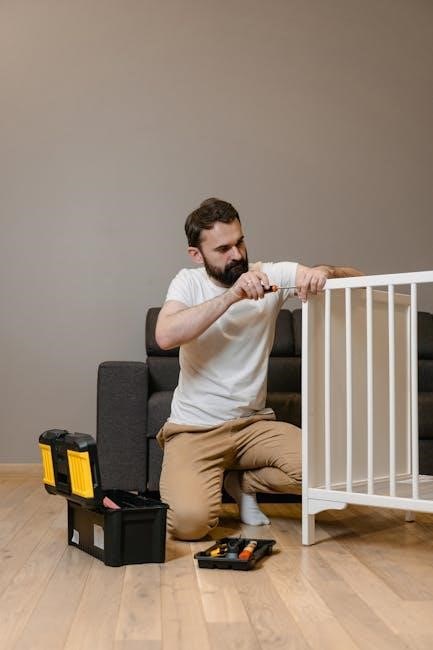
3.1 Attaching the Crib Sides
Begin by aligning the crib sides with the frame, ensuring proper fit and alignment. Use the provided screws to secure the sides tightly. Follow the manual for correct screw placement. Tighten firmly but avoid overtightening to prevent damage. Double-check stability before moving on; This step is crucial for the crib’s structural integrity and safety, ensuring a sturdy foundation for your baby’s sleeping area.
3.2 Assembling the Crib Frame
Start by placing the crib frame on a flat, stable surface. Attach the feet to the base using the provided bolts, ensuring they are tightly secured. Next, align the side panels with the frame’s pre-drilled holes and screw them into place. Use a wrench to tighten all bolts firmly, but avoid overtightening. Double-check the alignment and stability of the frame before proceeding. A sturdy frame is essential for the crib’s overall safety and durability.
3.3 Installing the Mattress Support
Begin by removing the mattress support from its packaging and positioning it inside the crib frame. Align the support brackets with the pre-drilled holes on the crib sides. Secure the support using the provided bolts, ensuring they are tightly fastened. Double-check that the support is level and evenly spaced to prevent sagging. Finally, place the mattress on top of the support, ensuring it fits snugly without any gaps. A properly installed mattress support is crucial for your baby’s safety and comfort.

Tips for a Smooth Assembly Process
Ensure all parts are present and undamaged, follow instructions closely, and secure all bolts and screws tightly to guarantee a safe and stable crib assembly.
4.1 Checking for Missing or Damaged Parts
Before starting assembly, thoroughly inspect all components for completeness and damage. Verify that every hardware piece, frame part, and accessory is included and in good condition. Check for sharp edges or broken pieces, as these can compromise safety. If any parts are missing or damaged, contact Bonavita customer support or the retailer for replacements. This step ensures a smooth assembly process and guarantees the crib’s stability and safety for your child. Proper inspection prevents delays and potential hazards.
4.2 Following the Instruction Manual Closely
Adhering to the Bonavita crib assembly instructions is crucial for a successful and safe setup. Read through the manual thoroughly before beginning to understand each step. Follow the sequence carefully to avoid confusion or mistakes. Double-check each part as you go to ensure proper alignment and secure connections. This attention to detail will help prevent errors and guarantee the crib meets all safety standards, providing a secure environment for your baby; Proper assembly relies on meticulous adherence to the provided guidelines.
4.3 Ensuring All Bolts and Screws are Secure
Tightening all bolts and screws is essential for the crib’s stability and safety. Use an Allen wrench or screwdriver to ensure every connection is firm. Double-check for any loose parts, as they can pose a hazard. Refer to the manual for specific torque requirements. Addressing any gaps or wobble ensures the crib is sturdy and secure for your baby. Properly secured hardware guarantees a safe and durable structure, providing peace of mind for parents.
Common Challenges and Solutions
Locating manuals, missing parts, and hardware issues are common hurdles. Solutions include online guides, customer support, and community forums for troubleshooting and assistance.
5.1 Locating the Assembly Manual
Locating the Bonavita crib assembly manual can be challenging, especially if the original packaging is missing. Start by checking the retailer’s website for downloadable manuals or guides. If unavailable, contact Bonavita’s customer service for assistance. Additionally, online forums and communities often share manuals or provide links to resources. Some users have successfully found manuals through third-party websites or by reaching out to fellow customers who own the same crib model. Persistent searching and community support can help you locate the necessary instructions.
5.2 Dealing with Difficult-to-Reach Parts
During Bonavita crib assembly, some parts may be challenging to access. Use a screwdriver or wrench with an extended handle for better reach. If bolts are hard to tighten, consider enlisting a second person to hold the crib steady. Double-check the manual for correct part placement and alignment. If visual guidance is needed, look for online tutorials or videos demonstrating the assembly process. Patience and careful maneuvering are key to overcoming these obstacles and ensuring a secure setup.

5.3 Addressing Sharp Edges or Hardware Issues
Inspect all components for sharp edges or damaged hardware before assembly. Use a file or sandpaper to smooth out any rough edges. If you find faulty hardware, contact Bonavita customer service for replacements. Ensure all bolts and screws are securely tightened to avoid instability. Properly addressing these issues is crucial for your baby’s safety and the crib’s durability. Double-check the crib’s frame and mattress support for any gaps or uneven surfaces after assembly. A safe and sturdy crib ensures peace of mind for parents.

Safety Checks Post-Assembly
Verify the crib’s stability, ensuring it is level and securely assembled. Check for any gaps or loose joints that could compromise safety. Ensure all hardware is properly tightened and that the mattress fits snugly without any overhang. Inspect the crib for sharp edges or rough surfaces. Confirm that all safety standards are met to create a secure environment for your baby.
6;1 Ensuring Stability and Levelness
Ensuring the crib’s stability and levelness is crucial for your baby’s safety. Use a level tool to check that all legs are evenly balanced on a firm, flat surface. Rock the crib gently to confirm it doesn’t wobble or tilt. If uneven, adjust the legs or place shims under them. A stable crib prevents tipping and ensures your child’s secure environment. Proper leveling also maintains the structural integrity of the crib, guaranteeing long-term safety and reliability for years to come.
6.2 Inspecting for Gaps or Loose Joints
After assembling the crib, inspect all joints and connections to ensure there are no gaps or loose parts. Use a flashlight to check tight spaces. Tighten any bolts or screws that feel loose. Gaps between panels or frames can be addressed by adjusting the parts or using shims if necessary. Regularly inspect the crib over time to ensure stability remains intact, as loose joints can develop with use. Properly securing all components guarantees a safe and durable sleeping environment for your baby.
6.3 Verifying All Safety Standards Are Met
Ensure the Bonavita crib meets all safety standards by checking for ASTM or JPMA certification. Verify the mattress fits snugly, rails are at the correct height, and no hazardous materials are present. Consult the manual for specific safety guidelines and ensure proper assembly. This guarantees the crib is safe and compliant, providing a secure environment for your baby.

Additional Resources and Support
Bonavita offers customer service, downloadable manuals, and online forums for support. Users can also find community advice and shared experiences to assist with assembly challenges.
7.1 Contacting Bonavita Customer Service
For assistance, visit Bonavita’s official website and navigate to the Customer Service section. You can email them at infobivonaco.com with your name, address, phone number, and specific inquiries. Provide clear details about your crib model and assembly issues for prompt support. Their team is dedicated to helping you resolve any challenges efficiently, ensuring your crib is assembled safely and correctly. This direct line of communication ensures you receive accurate guidance tailored to your needs.
7.2 Finding Assembly Guides Online
To find Bonavita crib assembly guides, start with the retailer’s website or the original packaging for downloadable manuals. Use specific keywords like “Bonavita Cabana Crib assembly manual” in online searches. Official Bonavita websites and trusted retailers often provide PDF guides or video tutorials. Additionally, check forums or community platforms where users share assembly experiences and tips. This ensures you have comprehensive resources to guide you through the assembly process smoothly and efficiently.
7.3 Community Forums and User Experiences
Community forums and user experiences are invaluable resources for Bonavita crib assembly. Many parents share tips, tricks, and solutions to common challenges online. Platforms like Reddit or parenting forums often have threads dedicated to specific crib models, where users exchange advice and support. Some users have even shared scanned copies of assembly manuals for discontinued models. These communities can be a lifesaver for those struggling with unclear instructions or missing parts, fostering collaboration and problem-solving among parents.


Leave a Comment